Aiomme Mansen Nukkistelijat-porukalla ruostuttaa miniesineitä ensi viikolla, ja sitä varten halusin tehdä Hosulille polkupyörän. Nyt vaan kun pyörä on valmis, en enää tiedä haluanko ruostuttaa sitä. :)
I made a bicycle for The Muddler and the idea was to rust it with Instant Rust but now when it's finished I'm not just so sure how much rust I would want to add to it...
Hosuli odottaa kevättä:
The Muddler is waiting for the spring:
Hosulin pyörässä ei ole lamppua, joten hän on kiinnittänyt hienon punaisen taskulamppunsa pyöränlampuksi.
The Muddler's bike doesn't have a lamp, so he has attached his red flash light to be used as a lamp.
OHJE --
- TUTORIAL
Huom. Tämä pyörä on kömpelö ja rustiikkinen, tällä ohjeella ei siis tule kovin siistiä pyörää. :)
Note: This bicycle is a bit clumsy and rustic, with this tutorial you won't get a very clean-looking bicycle. :)
KAAVA
Jos tulostat tämän oikeassa suhteessa, sillä saa kätevästi osista oikean kokoiset suhteessa toisiinsa.
PATTERN
If you print this in right scale it will be easy to make the parts in right size in relation to each other.
Tarvikkeet:
Ohutta metallilankaa ja paksua (käytin 1,5mm) rautalankaa
Maalarinteippiä
Muovailumassaa
Liimaa
Korun osia
Haaraniitti
Helmi noin 0,5 cm
Mikrohelmi
Pienoismallimaaleja
Akryylimaaleja
You will need:
Thin metal wire and thick (I used 1,5mm) iron wire
Masking tape
Polymer clay
Glue
Pieces of jewellery
Bead about 0,5 cm
Micro bead
Enamel paints
Acrylic paints
1

Tee ensin kaksi kaksinkertaista rengasta rautalangasta käyttäen jotakin pyöreää sopivan kokoista purkkia. Purkki jota itse käytin oli halkaisijaltaan 5,5cm. Käytin yhteen renkaaseen noin 40cm rautalankaa. Kiinnitä saumakohta kapealla maalarinteippisuikaleella. Leikkaa metallilangasta kolme pätkää. Väännä metallilangasta pyörän pinnat kuvien 1. ja 2. mallin mukaan. Kiinnita saumakohdat maalarinteipillä.
Make two double circles out of iron wire. I used for one wheel about 40 cm. Bend the circles around a jar. The jar's diameter I used was 5,5 cm. Cut 3 pieces of metal wire. Bend bicycle's spokes out of metal wire the way it is shown in the pictures 1. and 2. Seal the joints with masking tape.
2

3

Kun olet tehnyt yläkuvien pinnat, voit tehdä loput yhdestä pitkästä metallinlangan pätkästä punomalla ne kuuteen ensimmäiseen pinnaan kulkemalla aina keskikohdan kautta. Kiinnita jokainen pinna ulkoreunaan maalarinteipillä, etteivät ne liikkuisi pois paikaltaan.
You can make the rest of the spokes out of one long piece of metal wire always going around the center and using masking tape to keep the spokes in the right place.
Tee sama toisellekin pyörälle.
Do the same with the other iron wire circle.
4

Tässä vaiheessa voi olla hyvä kierittää ohuita maalarinteippisuikaleita renkaiden ympärille kauttaaltaan. Itse tein sen myöhemmin, mutta jälkiviisaana sanoisin, että se on helpompaa tehdä nyt.
In this point you can cut thin masking tape bits and cover both wheel thoroughly. I did it later but it would have been wiser to do it in this point.
5

Käsittele maalarinteipillä päällystetty reuna usealla liima (tai lakka) kerroksella että siitä tulisi sileämpi ja paksumpi.
Cover the mask taped area with glue (or lacquer) multiple times to make it smoother and thicker.
6

Litistä keskikohdan "solmu".
Flatten "the knot" in the middle.
7

Väännä rautalangasta kuvan mukaiset osat. Yhteen osaan meni n. 12,5 cm rautalankaa. Mutta pituus riippuu myös renkaittesi koosta.
Bend parts shown in the picture below. One part is approximately 12,5 cm long but the length depend also on the size of your wheels.
8

Kiinnitä nämä osat yhteen ja sitten kiinni pyörään maalarinteipillä. Voit laittaa liimaa pyörän keskikohtaan.
Attach these parts together with masking tape as shown in the picture. You can put glue on the middle of the wheel on both sides.
9

Kiinnitä osat pyörän keskikohtaan pätkäll' metallilankaa.
Attach middle part with a piece of metal wire.
10

Väännä kaksi kuvanmukaista osaa:
Bend two pieces like this:
11

Kiinnitä saumakohdat maalarinteipillä. Käännä yläpäässä oleva pätkä tässä vaiheessa kuvanmukaisesti.
Attach joints with masking tape. Bend the short part at the top as shown in the picture.
12

Laita osat päällekkäin ja kiinnitä ne toisiinsa maalarinteipillä.
Put the parts on top of each other and attach them with masking tape.
Väännä lyhyitä osia ylhäällä vähän ulospäin toisistaan.
Bend the short part on top little bit on the left and right as shown in the picture.
13

Yhdistä nämä osat...
Attach these parts...
14

...metallilangalla:
...with metal wire:
15

Ja sitten maalarinteipillä.
And then with masking tape.
16

Kiinnitä takapyörä samoin kuin etupyörä kiinnitettiin metallilangan pätkällä
Attach back wheel the same way as front wheel was attached with metal wire.
17
Tee polkimet Fimosta tms massasta käyttäen apuvälineitä:
Make the pedals out of polymer clay using tools like this:
18

19

Tein poljinten kiinnitysosan korun osista, mutta voit käyttää mitä löydät, esim haaraniittejä, tai voit tehdä ne fimosta tai vaikka pahvista.
I made the parts attached to pedals out of bits of cheap jewellery I had but you can use anything suitable you have, or make them out o polymer clay or cardboard.
20

Muotoile satula fimosta, paina se pyörän päälle ja irrota se varovasti.
Form the saddle out of polymer clay, press it on the bike. Remove it gently.
21

22

HUOM. Voit ohittaa seuraavan vaiheen, kuvat 24-26, jos sinulla on iso neppari (n. 1,5-2 cm) tai muu sopiva osa.
NOTE: This next part, pictures 24-26, can be skipped, if you have a big snap fastener (about 1,5-2 cm) or other suitable piece.
23

Tee pyörylä, johon polkimet myöhemmin kiinnitetään n. 2mm levyisestä pahvisuikaleesta sopivanpaksuisen kynän ympärille, kierrä toisen kerran ympäri, laita liimaa suikaleen toiselle kerrokselle.
Make the round bit that pedals will be attached later by making a circle out of a 2mm width strip of cardboard and bend it around a marker. Put glue on the second layer.
24

Paina rinkula ohuehkoon Fimo lättyyn.
Press the circle into a flat piece of polymer clay.
25

Leikkaa terävällä askarteluveitsellä kuvanmukaisesti.
Cut holes with a sharp knife as shown in the picture.
26

Paista Fimo-osat. Kiinnitä satula liimalla paikoilleen.
Bake the polymer clay parts. Attach the saddle with glue.
27

Kaiverra kolot polkimiin.
Carve pedals to fit the bits on the picture 29.
28

Liimaa nämä osat kiinni toisiinsa:
Glue these part together:
29

Maalaa pyörä ja muut osat pienoismallimaaleilla ja anna kuivua. Maalaa myös helmi. Liimaa helmi takapyörän keskelle.
Paint the bicycle and other parts with enamels. Let dry. Glue the bead in the middle of the back wheel.
30

Kiinnitä yksi poljin renkulaan hopeanvärisellä neulalla (työnnä neula varovasti renkulan läpi) ja katkaise pihdeillä ylimääräinen pätkä.
(Jos käytät nepparia, voit yhdistää polkimet siihen metallilangalla ja liimalla.)
Attach one pedal to the round part with a needle and cut the extra of the needle off.
(If you are using a snap fastener, you can attach the pedals to it with thin metal wire and glue)
31

Liimaa renkula+poljin kiinni pyörään ja kiinnitä toinen poljin toiselta puolelta toisella neulalla ja liimalla. Toinenkin neula painetaan renkulan läpi, mutta toisesta kohtaa ja ylimääräinen neulan pätkä katkaistaan.
Glue the round part + pedal to the bike and attach the other pedal from the other side with another needle. Needle should go trough the round part but not from the same point as the first needle. Cut the extra part of the needle off.
32

Kieritä pyörän sarviin ohuita suikaleita maalarinteippiä ja maalaa ne akryyliväreillä.
Put thin stripes of masking tape around the handles and paint them with acrylics.
33

PYÖRÄN KELLO
BELL
Leikkaa haaraniitin "haarat" pois, jätä vain 3-4 mm.
Cut this (don't know what this is in English!) like shown in picture 34. Leave only 3-4 mm on both sides.
34

Käytä korun lukkoa, leikkaa siitä rengasosa pois niin että se näyttä kuvanmukaiselta.
Use a lock from a necklace, cut piece of it of like seen in the picture.
35

Liimaa lukko haaraniitin sisään.
Glue the lock inside the other bit.
36

Liimaa kullanvärinen mikrohelmi päälle. Kiinnitä pyörään liimalla ja painamalle siivekkeet tankoa vasten.
Glue a golden color micro bead on the top. Attach to the bike with glue and by pressing the side bits around the bar.
37

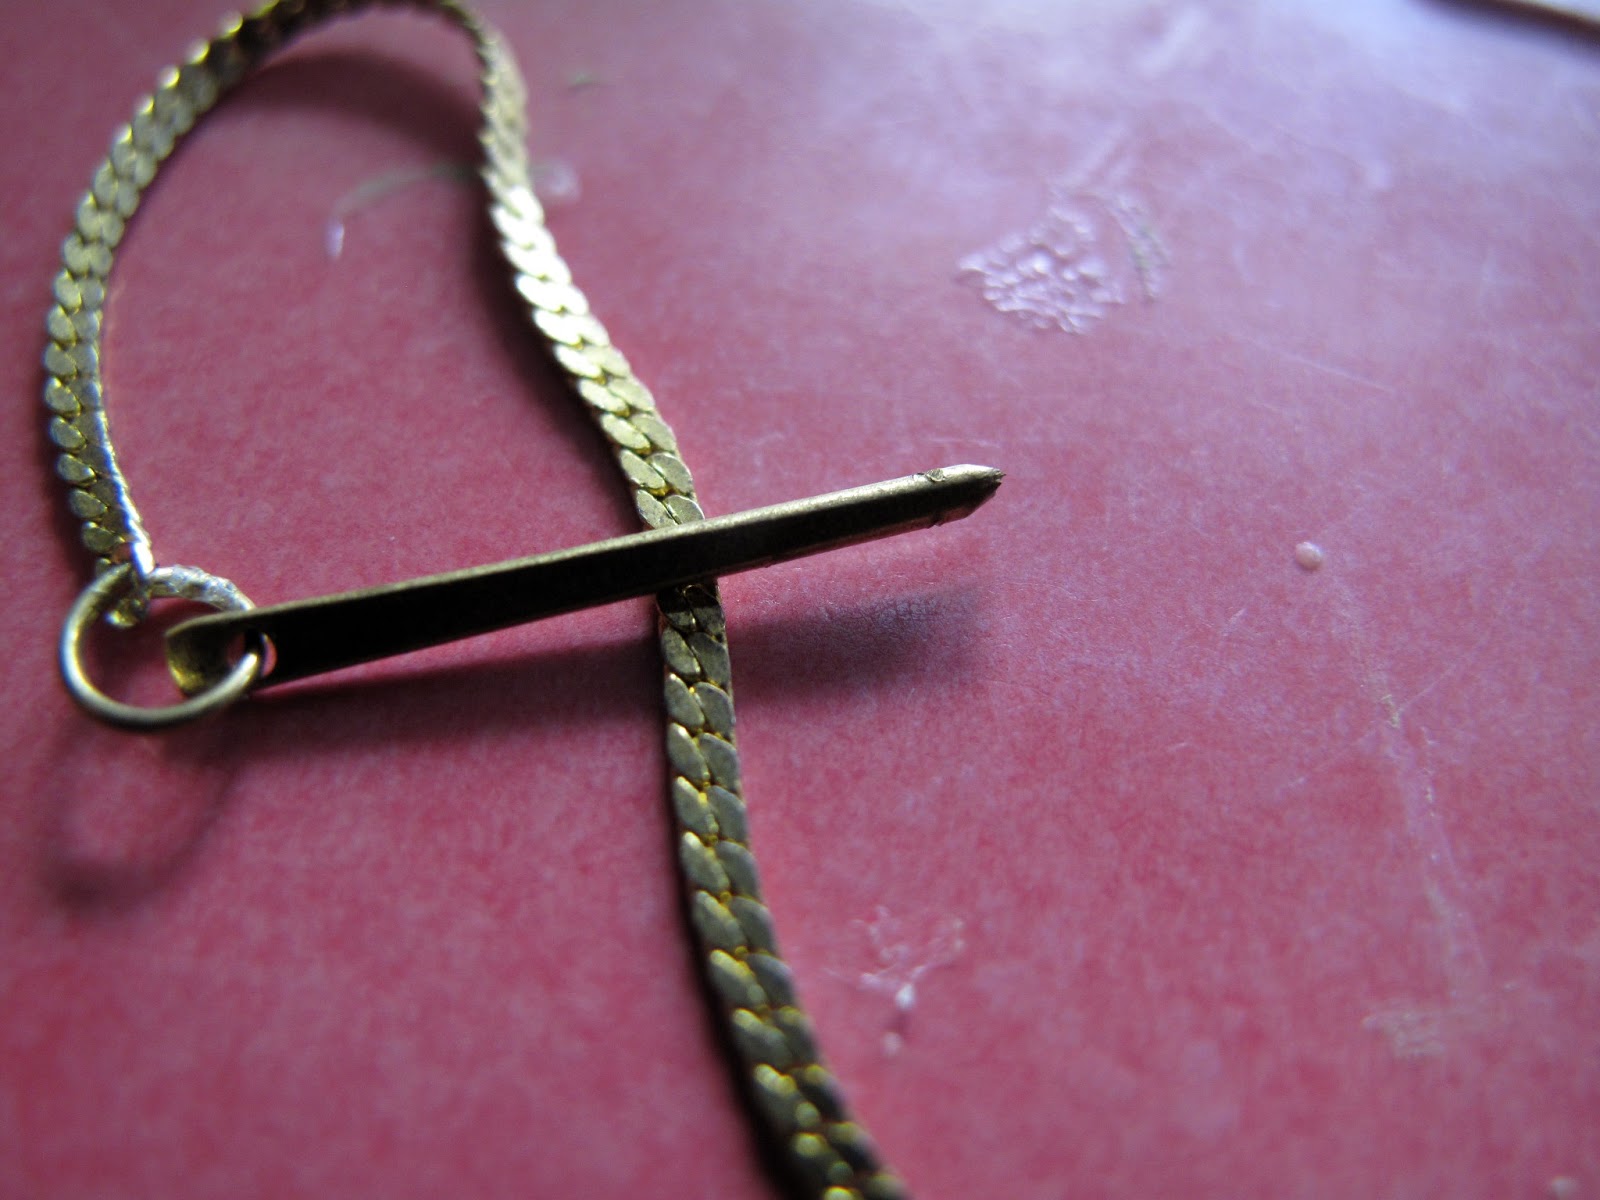
Tee pyörän ketjut halvasta kaulaketjusta (tämä on kirpputorilta).
Use a cheap necklace to make the chains (I bought this one from a flea market).
38

Liimaa ketju paikalleen takapyörän keskellä olevan helmen ja poljinrenkulan ympärille.
Glue the chain on its place around the pedal round thingy and around the bead n the middle of the back wheel.
39

Maalaa ketju tarvittaessa. Korjaile tarvittaessa maalausta. Maalasin renkaat akryylimaalilla, koska pienoismallimaaleilla niistä tuli liian kiiltävät.
Paint the chain if needed.
Fix the painting if necessary. I used enamel on the bicycle and acrylic on the wheels to make it look more like rubber.
Valmista!
You are done!
Taskulamppu on tehty kartongista, strassista ja pätkästä siveltimen suojaputkea, ja maalattu pienoismalli- ja akryyliväreillä.
The flash light is made out of cardboard, a rhinestone and a bit of "a straw looking thing that covers a paint brush". Its painted with gold enamel paint and red acrylic.